If your Lü is not turning on
Step 1 - Check the projector source
Make sure the projector is set to the correct input source.
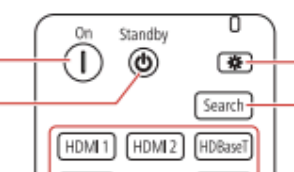
Press the “HDMI 1” button on the top of the projector remote to select HDMI 1. If there’s no response, try pressing “HDMI 2” instead.
Press the “HDMI 1” button on the top of the projector remote to select HDMI 1. If there’s no response, try pressing “HDMI 2” instead.
You can also try to change the batteries of the remote.
Step 2 - Activate the Lü System
Step 2 - Activate the Lü System
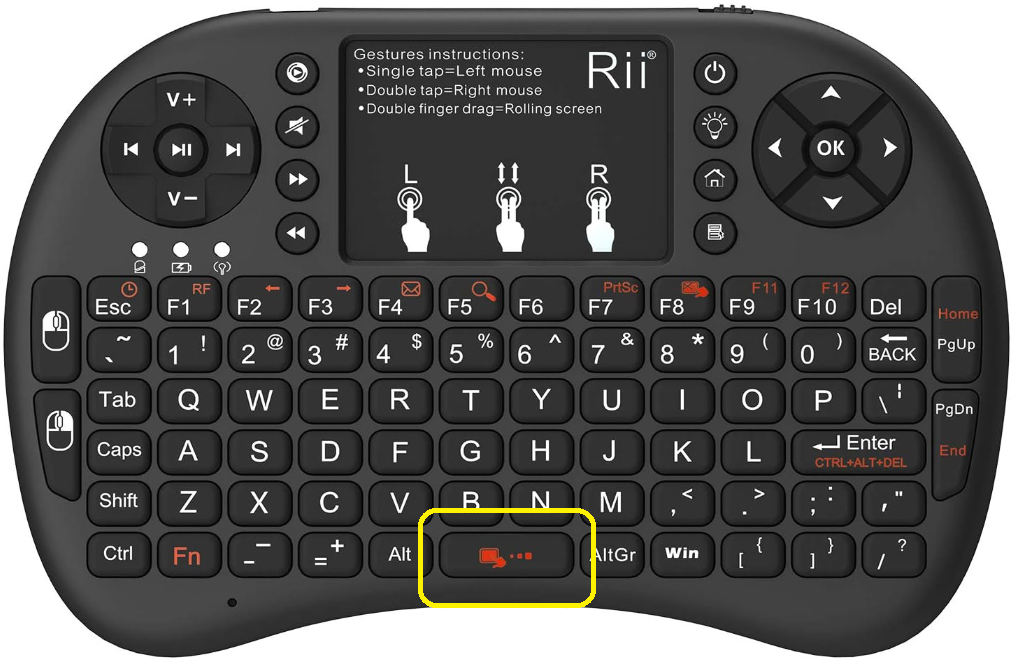
Using the Lü remote, press the spacebar repeatedly for 5 seconds until the screen turns on. You should see the Dell logo appear.
Step 3 - Re-sync the Lü remote
1. Turn off the Lü remote.
2. Hold the "F1" key.
3. While holding "F1", turn the remote back on, then release the "F1" key.
This action should sync the remote back to the Lü system. The amber light will start blinking faster but should stop after a few seconds when the remote is synchronized.
Step 4 - Reset the Lü system
1. Turn off the projector.
2. Locate the breaker connected to the Lü system.
3. Switch off the breaker and leave it off for 4 to 5 minutes.
4. Turn the breaker back on.
5. Return to your Lü and turn the projector on again.
This process may help reset the system and resolve any persistent issue.

This step does not apply to the Möbil. Instead, unplug the power cable from the unit to reset it.
Step 5 - Press the power button and check the HDMI cable
If the screen is still blank, follow the instructions for your specific Lü system model:
Lü 2nd generation
- Open the heart module cover by removing the single screw.
- Press the computer’s power button, located at the bottom left of the heart.
If the problem persist :
1. Remove all external peripherals, such as the HDMI cables, and the USB cables.
We recommend taking a quick photo of the connections so everything can be plugged back exactly as it was.)
2. Disconnect the power cord from the wall outlet.
3. Press and hold the power button for 10 seconds.
4. Reconnect the power cord to the wall outlet and try powering on the computer again.
Möbil
- Turn off the projector.
- Remove the back cover by unscrewing the six screws.
- Press the computer’s power button.
- Disconnect and reconnect the HDMI cable from the computer.
- Optionally, try a different HDMI port.
Lü 1st generation
- Use a ladder or lift to access the light and sound module (the computer is inside)
- Press the computer’s power button, wait one minute, then press it again.
- Disconnect and reconnect the HDMI cable from the computer.
- You can also try a different HDMI port.
Related Articles
Fixing remote pairing: Flashing orange light
An orange flashing light on the keyboard remote, even when no keys are being pressed, indicates that it is no longer paired with its USB receiver. To re-synchronize the keyboard remote, follow these steps: 1. Turn off the remote. 2. Press and hold ...Lü 1st generation - Change the image ratio
If any part of the screen does not display correctly in the projection, the aspect ratio may have been accidentally changed. To change the image ratio and thus have a full screen, press the Aspect button using the projector remote control and choose ...Correcting Image Shape with Quick Corner
You can use the projector's Quick Corner setting to correct the shape and size of an image that is unevenly rectangular on all sides. Note: To provide the best possible image quality, adjust the projector's position to correct the image shape. If ...Flickering projection
If you are experiencing flickering on the projector, please follow these steps: Step 1: Adjust HDMI IN EQ Level On the projector remote (the small white one), press the Menu button. Navigate to Signal I/O > HDMI IN EQ Level. Make sure the HDMI1 ...Optimal Projector Adjustment
Once the auto-adjustment is complete, the following options will appear on screen : If the size, positioning, and focus of the projection are satisfactory, press OK. Otherwise, you can: Press Esc to retry automatic adjustment. Press Play to proceed ...