Assembly Instructions
Before any use, carefully follow these instructions of the complet user manual to ensure proper assembly of the system and avoid accidents.
Note: Be cautious when handling the devices to avoid pinching hazards. It is recommended to carefully read the safety instructions. If in doubt, contact the Lü support team.
- Base Installation
A) Remove the base from its transport case (transport case #2).
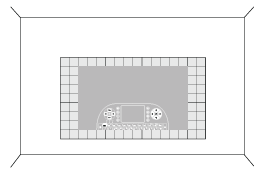
B) Identify the projection wall.
C) Place the base approximately 4.5 m to 6 m from this wall.
D) Orient the base so that the Lü logo faces the projection wall.
E) Using the Laser rangefinder provided in the head’s transport case (transport case #1), position the base 6 meters from the projection wall.
Note: To maximize the chances that the projector auto-adjusts correctly, install the front face of the base perfectly parallel to the wall.
Head Installation
A) With the help of another person, remove the head from its transport case using the designated handles.
B) Place the head on the base: position the head above the base in the correct orientation and push down until you hear a “click,” indicating the locking latch is fully engaged. The head must be locked before proceeding to the next step.
Note: The mast will not deploy unless the head is properly seated and locked.
Electrical Connection and Power On
A) Plug the power cable into the base.
B) Plug the base power cable into a 120V outlet.
C) Press the power switch to turn on the unit.
Leg and Mast Deployment
A) Press and hold the lift button on the control panel to deploy the legs and raise the head to its maximum position or the height allowed by the ceiling.
Note: The mast deploys in 3 stages with a short pause between each stage.
Note 2 : The projector and system computer will power on automatically as the mast extends.
B) The system will go into “ready-to-play” mode when it is immobilized for more than 3 seconds. Once the head is in position, wait a few seconds for the fixture to finish lighting up and for the system to self-adjust.
Note 3: It is recommended to raise the mast until it reaches its full height (automatic stop) and to hold the button a few seconds longer until the compressor stops running.
5. Image Adjustment
A) The projector will automatically adjust a few seconds after the head stops moving.
B) When finished, follow the on-screen instructions to adjust the projection if needed or continue. The ideal dimensions will be displayed.
6. Camera Calibration
A) The camera will automatically calibrate once auto-adjustment is complete. Please wait a moment while the calibration grids display and show the calibration result. If successful, the Lü application will launch. Otherwise, follow the on-screen instructions to manually restart the calibration.
B) Once calibration is successful, you can begin your game session.
Note: It is important to keep the camera and projector fields clear to avoid interfering with projector auto-adjustment and camera auto-calibration.

Still have questions? Contact us!
Related Articles
Disassembly instructions
Before any use, please follow these instructions carefully to ensure proper disassembly of the system and to avoid accidents. 1. Shutting Down the Computer A) Using the remote control, hold down the Power button for 3 seconds to switch off the ...Möbil - How to setup your unit
To learn how to set up the Möbil unit, please watch this video : https://vimeo.com/797792958 You can also consult the User Guide attached to this article. Still have questions? Contact us!Quick Start Guide and User Guide
Attached are two essential resources to help you get started with your Möve: Quick Start Guide: This document walks you through the setup and initial use of the system, perfect for getting started quickly. User Guide: A complete guide covering all ...Link Your Profile to Your Lü Account
To ensure you can fully enjoy all Lü Community features and access the benefits of the Lü+ subscription, it is necessary to link your user profile to your Lü account. If it's your first time signing-in on your Lü system, make sure to follow all the ...First Time Sign In on Your Lü System
Before logging in to your Lü system for the first time, make sure you have created a Lü account on the website www.lu-community.com. To learn how to create a Lü account, refer to this article: Create a Lü Account. To log in to your Lü for the first ...